Tether User Guide
What if you could enjoy the dynamic nature of professional Applicant Tracking Systems combined with the timeless simplicity of tracking tools like Excel?
Welcome to Tether, a free offline desktop application built for the everyday Hiring Manager (HM) such as yourself! Our application enables you to record applicant and interviewer details, schedule interviews, and access a high-level overview of applicant/interviewer/interview statistics. Tether is optimised for the HM that prefers a core set of features supported by a minimal, but smart, interface with no dependency on the internet.
If you have found yourself here in this user guide, it probably means you need some help setting up and/or using our application. Thus, our user guide serves to
- Provide you with some context on what our application is and how it is different from traditional desktop applications,
- Help you install and run Tether,
- Orientate you through Tether's interface,
- Enumerate and explain the features available to you and,
- List any planned enhancements to keep you appraised of how we're improving Tether.
There is also a List of Contents at the start, and a Glossary and FAQ section at the end to ease and expedite your perusal of our user guide.
Ready to make hiring management easy for yourself? Let's get started!
List of Contents
- Getting Started
- Features
- Using Features Error-Free
- Adding an Applicant
- Adding a Status to an Applicant
- Adding an Interviewer
- Viewing the Status of an Interviewer
- Adding a Remark to a Person
- Adding an Interview
- Listing All Persons
- Listing All the Interviews
- Finding Persons
- Filtering Persons by Status
- Filtering Interviews by Date
- Deleting a Person
- Deleting an Interview
- View Overall Statistics
- Clear All Existing Data
- Exiting the Program
- Saving your Data
- Planned Enhancements and Known Limitations
- Glossary
- FAQ
- Command Summary
Getting Started
This crucial section is where your journey with Tether starts. Here, you may learn the context for Tether, how to set up and run Tether, the structure of the application, and where to find help quickly if you need it. For terms which we feel may be a little technical or require further contextualising, we add numbering like so [0] beside them and then define those terms in our Glossary.
Context on Tether
Tether is not your typical application that you may download off an app-store and directly launch from your desktop. It is an offline application that launches from and runs entirely through your computer's Command Line Interface (CLI) [1] which is a medium through which you directly interact with your computer system.
The way Tether works is, once you set up and launch the application from the CLI (as you will learn below in Quick Start), you type-in commands into a Graphical User Interface (GUI) [2] to use the application. We employ this modus operandi to cut down on visual-noise such as buttons and click-away popups, and allow you to focus your hands only on the keyboard.
In short, if you can type fast, Tether can get your hiring management tasks done faster than traditional GUI apps.
Further, the data you create on Tether will not be saved in any online platform, but locally in your computer in a json [3] file. You may even directly edit your data in this file if need be and the changes will be reflected when you (re)launch Tether. The benefit of this is that if you need a quicker way of fixing or updating your data than using commands on our application, the json file is at your disposal.
Below you will see a listing and explanation of the exact commands you will need to use our available features.
Quick Start
Ensure you have Java 11 or above installed in your Computer. This is a crucial step as Java, one of the world's most prominent programming languages, is the backbone of how our application operates.
- If you do not have Java 11, download it from here
- For Mac users, you are recommended to download from here to prevent any issues running the
tether.jarfile.
- For Mac users, you are recommended to download from here to prevent any issues running the
- Help with configuring correct Java version: Windows | MacOS | Linux
- If you do not have Java 11, download it from here
Click to download the latest
tether.jarfrom here.Open your file manager (search for File Explorer in your computer for Windows, or Finder for Mac), and navigate to your downloads section
Copy the downloaded
tether.jarto a new folder that you will use as the home folder for Tether (from here on, let tether_folder refer to this home folder). You may choose to create this new folder in the downloads section as well, for later convenience.Open a command line interface (Command Prompt in Windows or Terminal in Mac) and follow these steps:
- Once you open the interface, you will notice an almost blank screen with a single line and a cursor waiting for input. This means you are now in your home directory of your computer.
- Type in the command
cd("change directory") to navigate to the folder you put the jar file in.- Example: if your home directory starts at "~" and you wish to navigate to downloads, first type
cd downloadsand press enter to navigate into downloads and then typecd tether_folderto navigate into your tether_folder - Tip for Mac Users: when you first open the CLI and start at your home directory, type in
cdand then simply drag and drop the tether_folder into the terminal. Press enter and you will directly find yourself in the tether_folder.
- Example: if your home directory starts at "~" and you wish to navigate to downloads, first type
- Now that you are in the tether_folder, enter
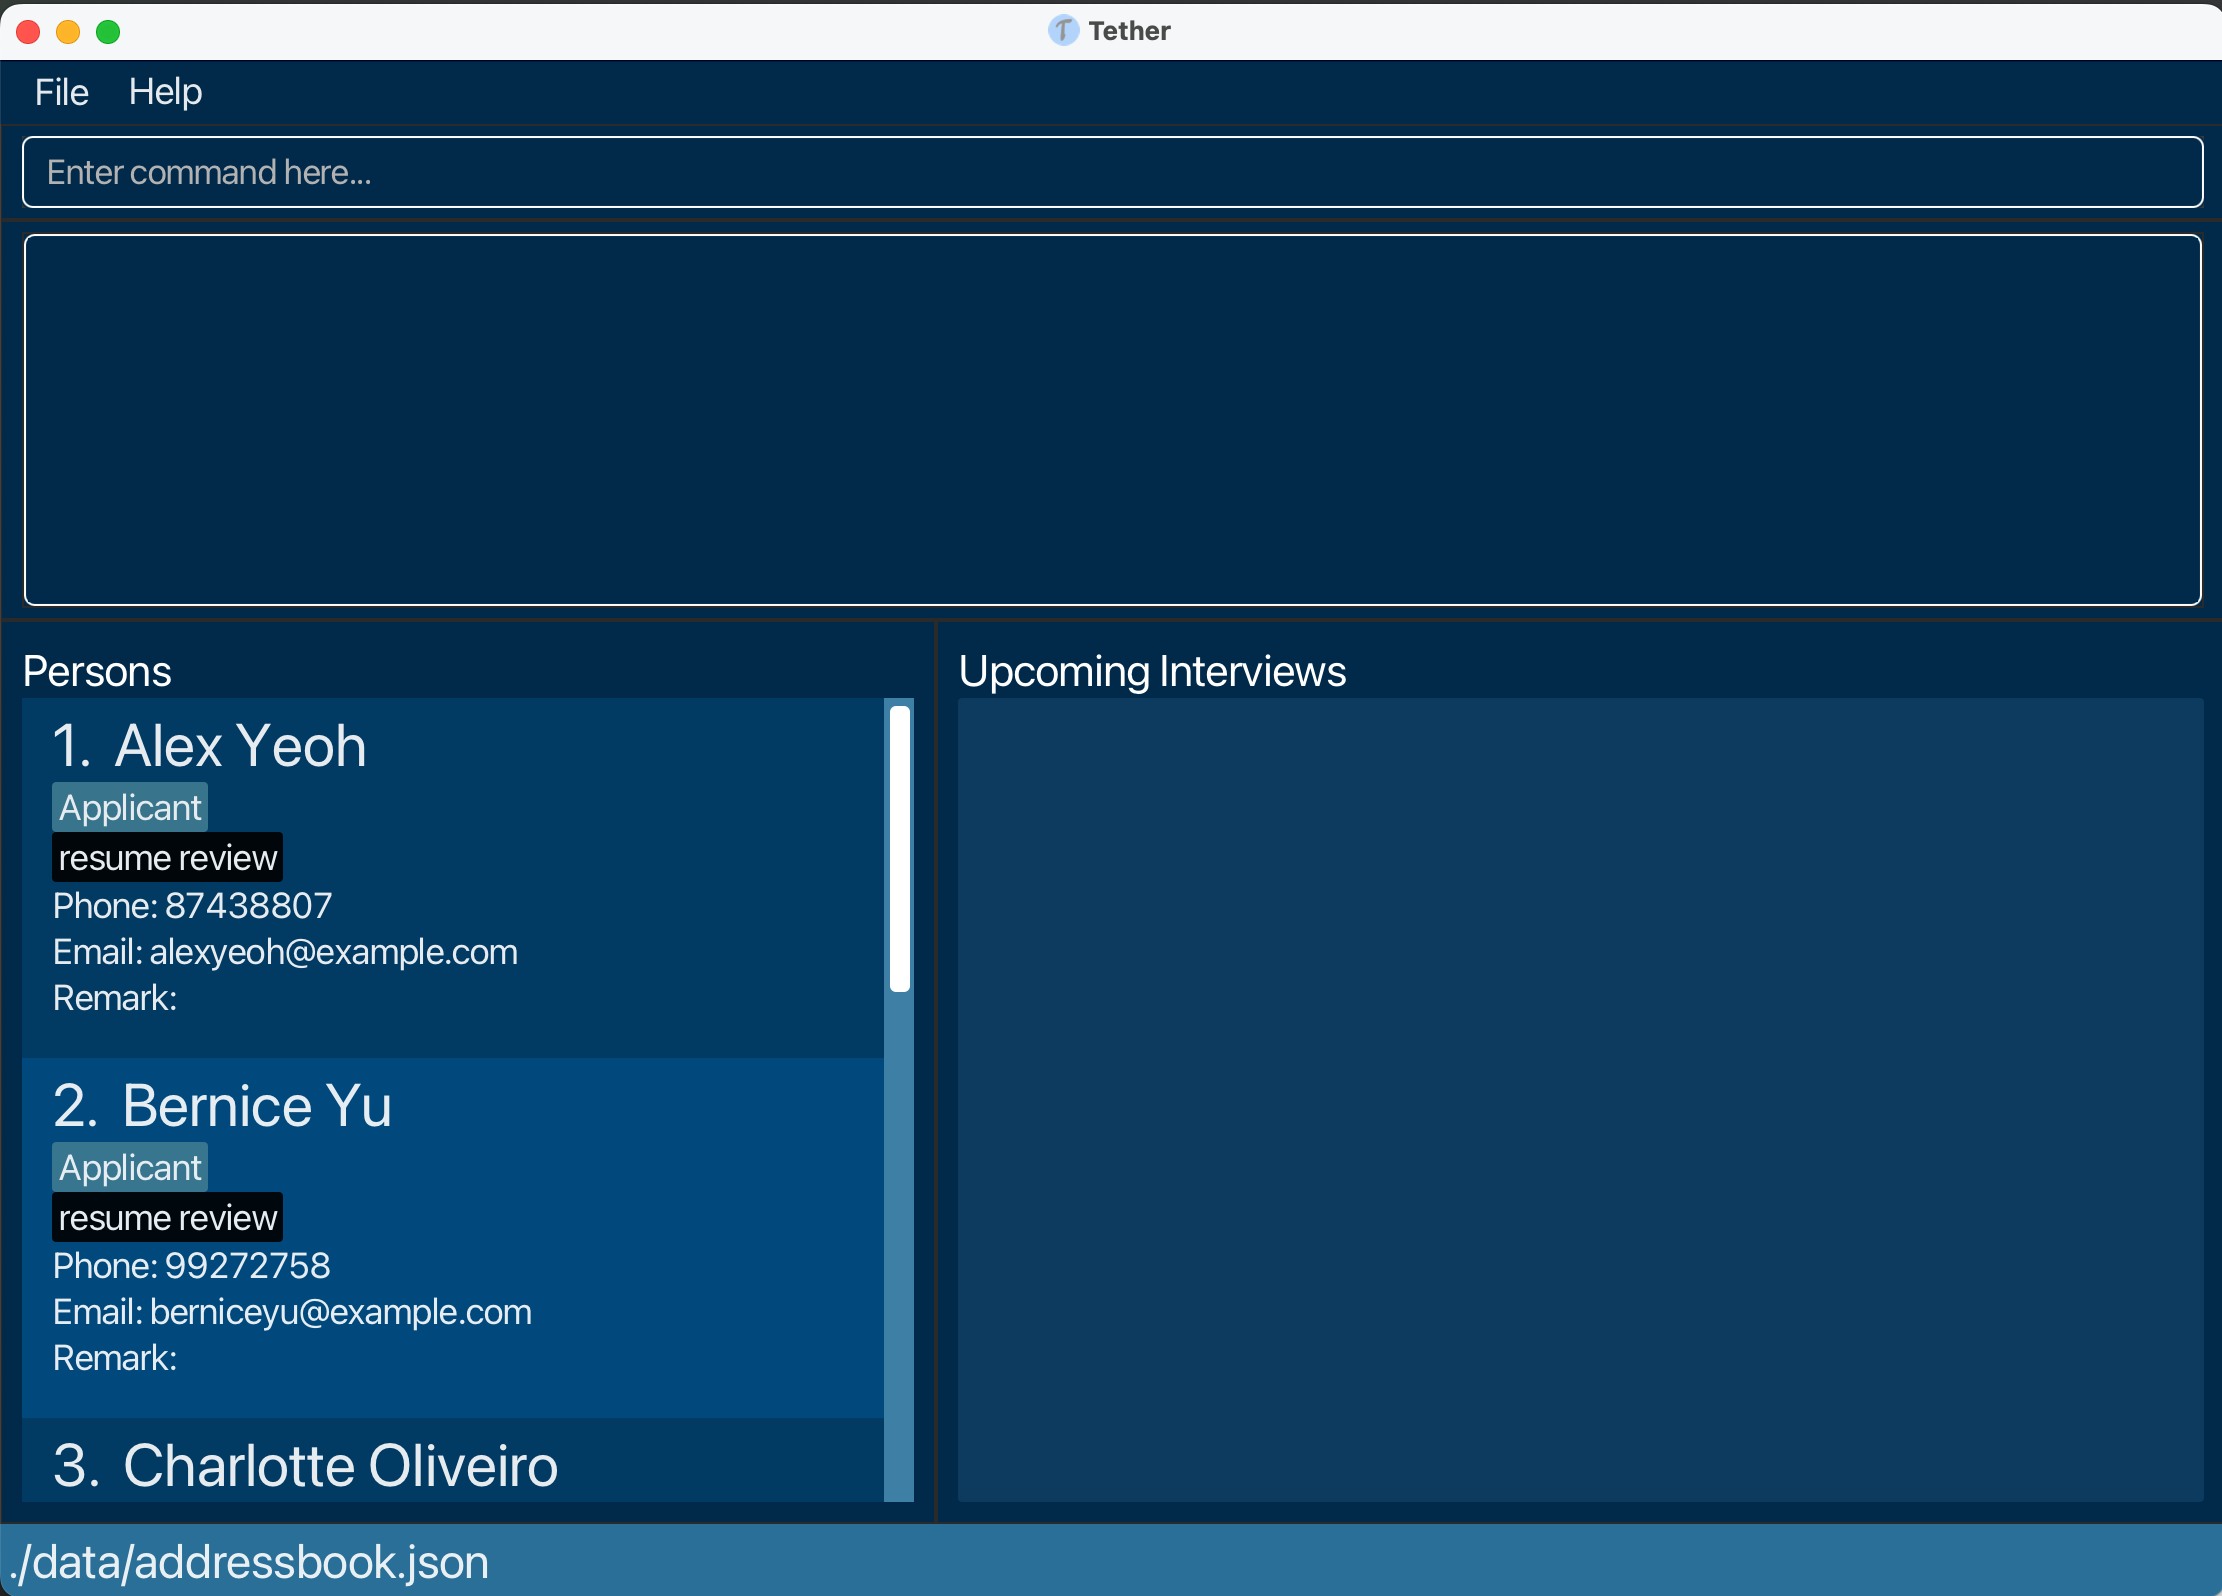
java -jar tether.jarcommand and press enter to run the application. A GUI similar to the below should appear in a few seconds. Note how the app contains some sample data.
Gathering your bearings
Before delving into the features, we want you to give you a brief tour on how to use our application.
The structure of Tether
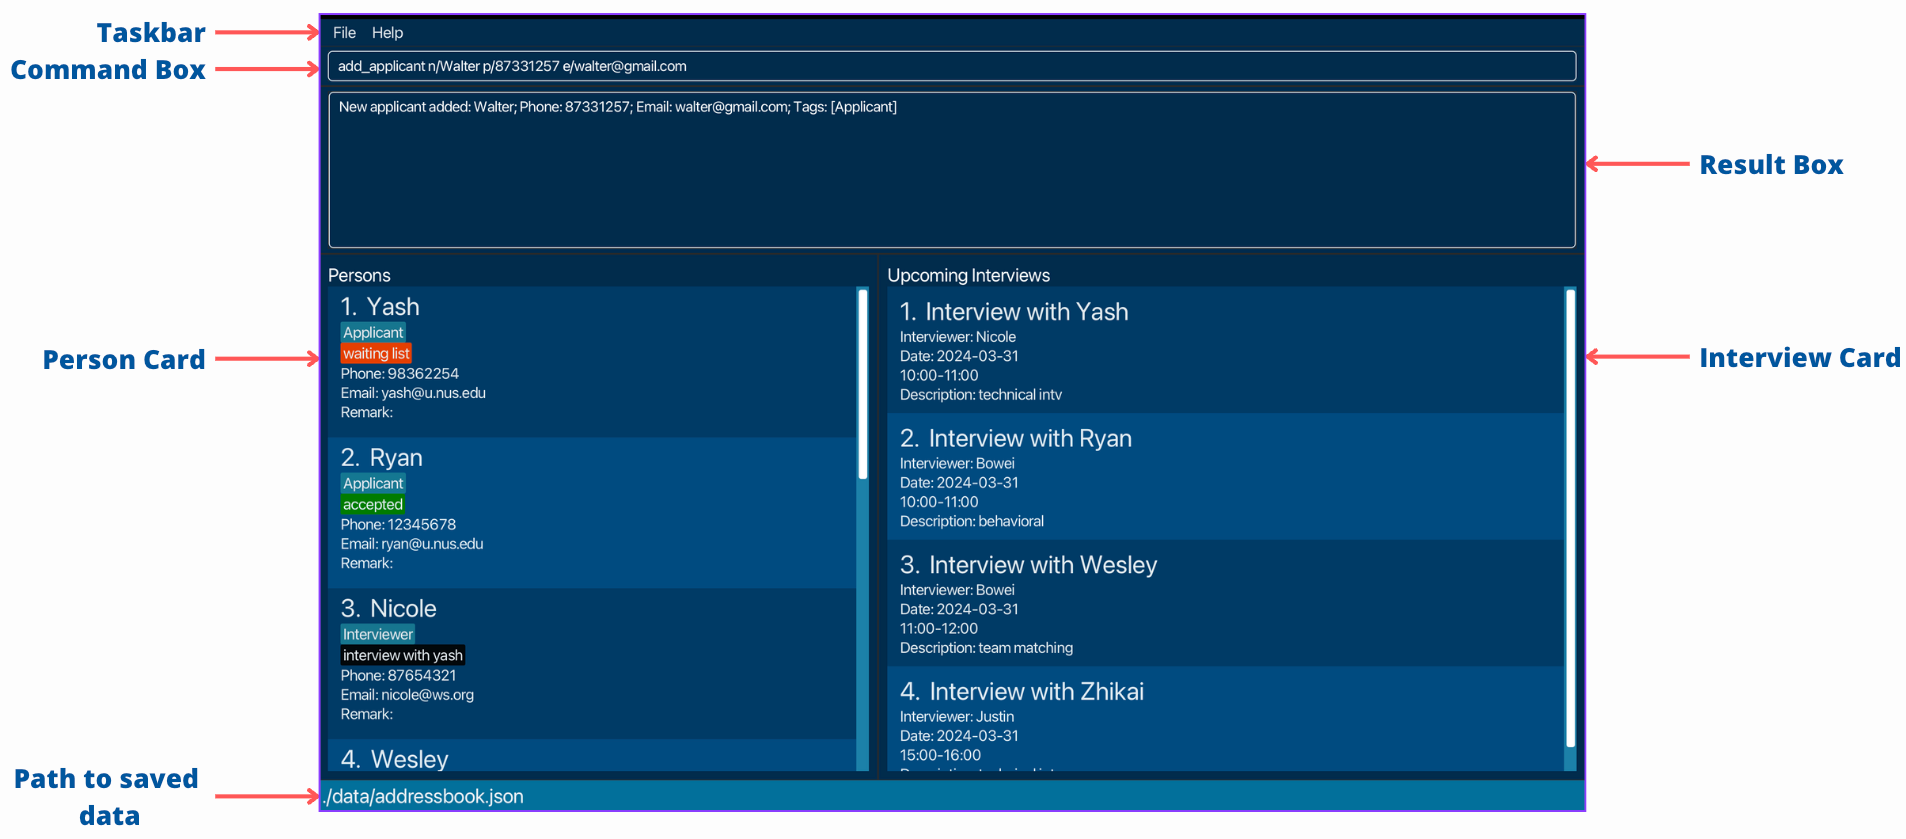
- Taskbar: Where you may click on either the File or Help buttons.
- Command Box: Where you enter commands (which are later forwarded to the CLI for execution).
- Result Box: Where success or error messages, if any, for executed commands are displayed
- Note that the Result Box may not necessarily refresh everytime a new command is executed. This may happen if, as an example, a command incurs a fatal error before it can generate a result.
- Person/Interview Card: Where the details of each person [4] and interview you add are displayed
- Path to saved data: The location (i.e. the place you created the tether_folder from earlier) of the folder data in which your person/interview data file addressbook.json is saved. If you followed the instructions in the Quick Start closely, when you first run and use the application using
java -jar, the data folder should be automatically created in the same tether_folder that you created to store thetether.jarfile.- Note: If you move the data folder or the enclosed addressbook.json file to some other location, the application will not load with your existing data. This is because the application searches for the data folder in the same location as your
tether.jarfile. The path to saved data will not update itself if you move the data folder. - To summarize, just do not touch the data folder or the addressbook.json file as doing so would cause issues with your existing data.
- Note: If you move the data folder or the enclosed addressbook.json file to some other location, the application will not load with your existing data. This is because the application searches for the data folder in the same location as your
Help yourself!
Simply execute help or press the Help button in the taskbar to launch a help window that shows the list of commands.
Features
Now that we've gone over the basics, let's dive into how you may use Tether for your most essential hiring management tasks!
Using Features Error-Free
Notes about the command format:
Most commands are in the format
commandname [parameters].Take note of parameters [5] that have special prefixes such as
n/for name ande/for email.Command names are case-sensitive.
e.g if you type inADD_APPLICANTinstead ofadd_applicant, it is interpreted as an invalid command.Tether will give appropriate feedback if any parameter constraints for commands are violated. However, this feedback may not always be very specific as to exactly which parameters are violated and in what way. To help you in this matter, we do list parameter constraints along with the commands that first use them (i.e. the same parameter constraints will not be explained everytime the parameter is used, only the first time).
Tether will ignore leading and trailing whitespaces for all parameters except for the
filter_by_statuscommand.Tether will ignore extraneous parameters for commands that do not take in any parameters (
help,clear,exit,view_overall_statistics). For example, if you attempt to executehelp 123, it will be interpreted ashelp.If you are using a PDF version of this document, be careful when copying and pasting commands that span multiple lines as space characters surrounding line-breaks may be omitted when copied over to the application.
Consequences of adding invalid values for fields:
The application may not load any data at all upon launch.
- If you make invalid edits to the addressbook.json file such as changing a person's name to be an emoji, Tether will launch with no data until invalid fields are rectified.
- The definition of an invalid edit is far from exhaustive, but a good indicator is that if the edit violates basic parameter constraints of the fields (which are explained below), then it is likely to be invalid.
The application may fill up with incoherent data.
- Tether may not always check against invalid edits. If you attempt to add illogical data such as editing all person emails in the addressbook.json to be duplicated or add interviews whose dates precede the current date, the application will allow you to do so at your expense.
- To be safe, do check what parameters you use for commands and be careful editing the addressbook.json file.
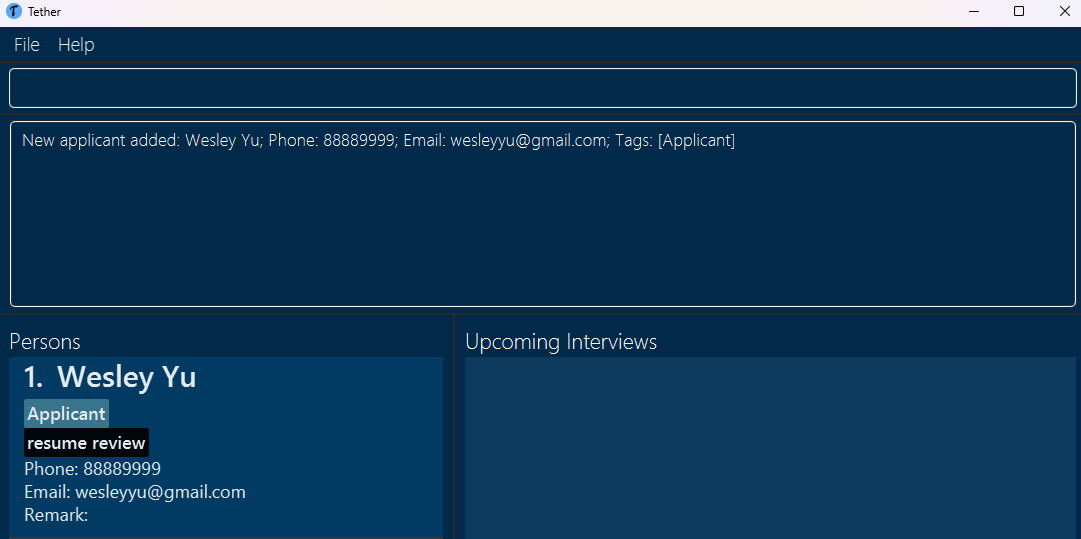
Adding an Applicant:
One of the first steps in the hiring pipeline is when an applicant submits their name for consideration.
To record an applicant and their contact details in Tether, simply execute add_applicant n/NAME p/PHONE e/EMAIL and the applicant will appear under the Persons column as seen via the example usage below.
Example Usage:
add_applicant n/Wesley Yu p/88889999 e/wesleyyu@gmail.com
Parameter Constraints:
- Names can only contain alphanumeric [6] characters and spaces, and should not be blank.
- Phone numbers must be at least 3 digits long and strictly only contain numbers (i.e. no spaces or dashes).
- Emails should be of the format local-part@domain and adhere to the following constraints:
- The local-part should only contain alphanumeric characters and the special characters (+_.-), excluding the parentheses. The local-part may not start or end with any special characters.
- This is followed by a '@' and then a domain name. The domain name is made up of domain labels separated by periods.
The domain name must:
- End with a domain label at least 2 characters long.
- Have each domain label start and end with alphanumeric characters.
- Have each domain label consist of alphanumeric characters, separated only by hyphens, if any.
Notes:
- No two applicants can have the same email or phone number.
- For two applicants to be considered different, they must have different emails and different phone numbers.
- If you are a discrete mathematics enthusiast, this is equivalent to
~(sameEmail || samePhone) = ~sameEmail && ~ samePhone = differentEmail && differentPhone.
- Applicants' remark field will be empty by default and can only be edited later with the
remarkcommand (described below). - An applicant will have an Applicant tag (as pictured above, below the name Wesley) by default. Customising this tag or adding additional tags is not currently possible.
Adding a Status to an Applicant:
Now that you know how to add an applicant, it would be nice to record their position in your hiring pipeline at any given time for later review. This is where tagging applicants by status is handy.
Simply execute applicant_status PHONE s/STATUS where PHONE is the target applicant's phone number and STATUS may only be any one of:
- "Resume review": for when an applicant has only just entered your hiring pool. Note that this is the default status an applicant receives when first added.
- "Pending interview": for when you are satisfied with an applicant's potential and have set up or are in the process of scheduling an interview for them.
- "Completed interview": as the natural successor to the previous status.
- "Waiting list": if you - or more specifically the interviewer - are not quite sure about an applicant's future.
- "Accepted": in the case that an applicant has impressed their interviewer enough for you to send a happy email as soon as possible.
- "Rejected": for the unfortunate case....
Example Usage
applicant_status 98362254 s/accepted.

Parameter Constraints
- A STATUS may strictly only be any of the statuses enumerated above. However, STATUS is case-insensitive i.e.
s/acceptedis as valid ass/AcCepTed. - If multiple valid status parameters are used, such as
add_applicant PHONE s/accepted s/rejected, then only the last status will be considered i.e, the applicant's status will become rejected. - If multiple valid statuses are given through one status parameter, such as
add_applicant PHONE s/accepted rejected, then an error will be displayed since "accepted rejected" is not any one of the valid statuses. Simply put, the clause immediately following ans/prefix is considered as one status.
Notes:
- The
applicant_statuscommand overwrites the applicant's current status. Ultimately, we want you to be able to pivot your applicants to any stage of the hiring pipeline. - If you schedule an interview with a particular applicant, the applicant's status will change automatically from resume review to pending interview. Conversely, if you delete an interview involving an applicant, their status will revert to resume review regardless of what their previous status was.
Adding an Interviewer:
Recording all potential applicants is one thing, but to meaningfully schedule interviews for them, you also need a host of interviewers and their details.
To record an interviewer and their contact details in Tether, simply execute add_interviewer n/NAME p/PHONE e/EMAIL and the interviewer will appear under the Persons column as seen via the example usage below.
Example Usage
add_interviewer n/Yash p/99998888 e/yash@gmail.com

Notes:
- Similar to applicants, no two interviewers can have the same email or phone number.
- Interviewers' remark field will be empty by default and can only be edited later with the
remarkcommand (described below). - An interviewer will have an Interviewer tag (as pictured above, below the name Yash) by default. Customising this tag or adding additional tags is not currently possible.
Viewing the Status of an Interviewer:
Now that you know how to add an interviewer, it would be nice to record their availabilities at any given time for subsequent interview scheduling. Happily however, there are no commands here to manage interviewer statuses manually!
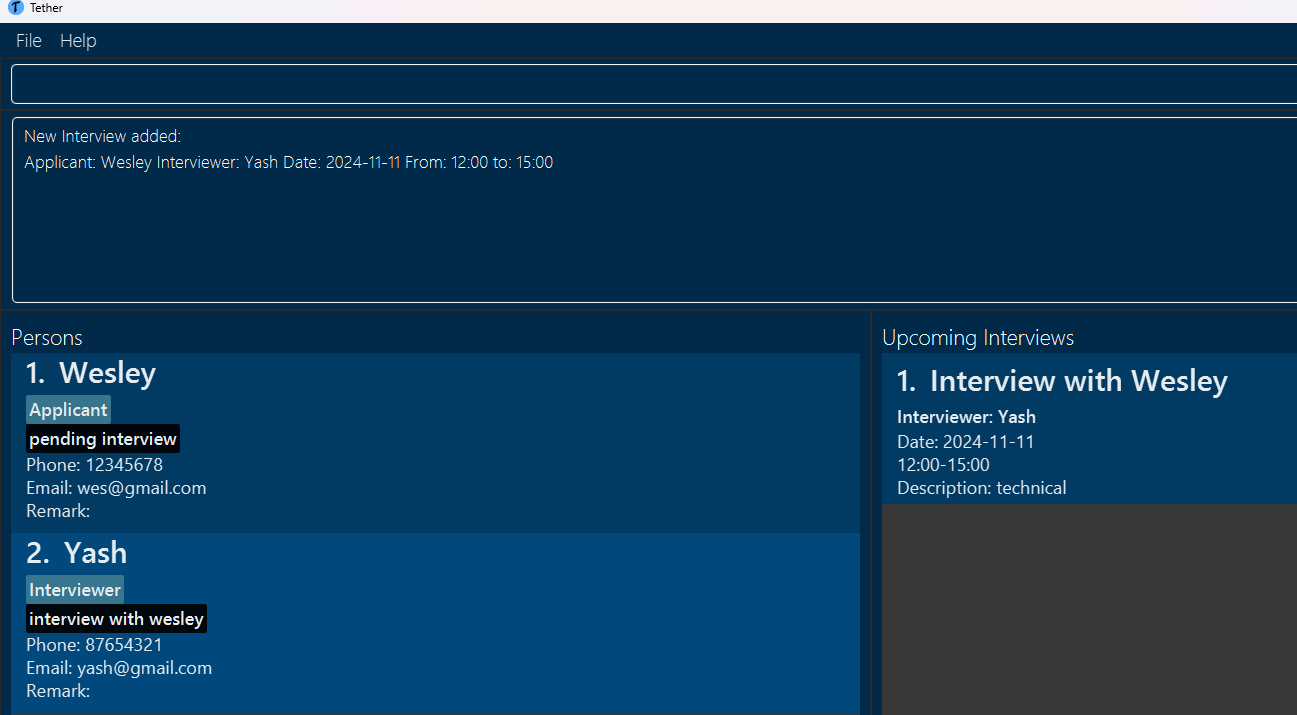
Tether is capable of tagging an interviewer with a status automatically when an interview concerning the respective interviewer is added. As a specific example, if an interview is scheduled between applicant Wesley and interviewer Yash, then Yash is given a status of interview with wesley. If an interviewer has no scheduled interviews, then their status will be free.
At any time, an interviewer's status can only either be free or a list of interview with... for all the applicants they are interviewing.
As more interviews are added, the interviewer's statuses stack on top of each other like so:
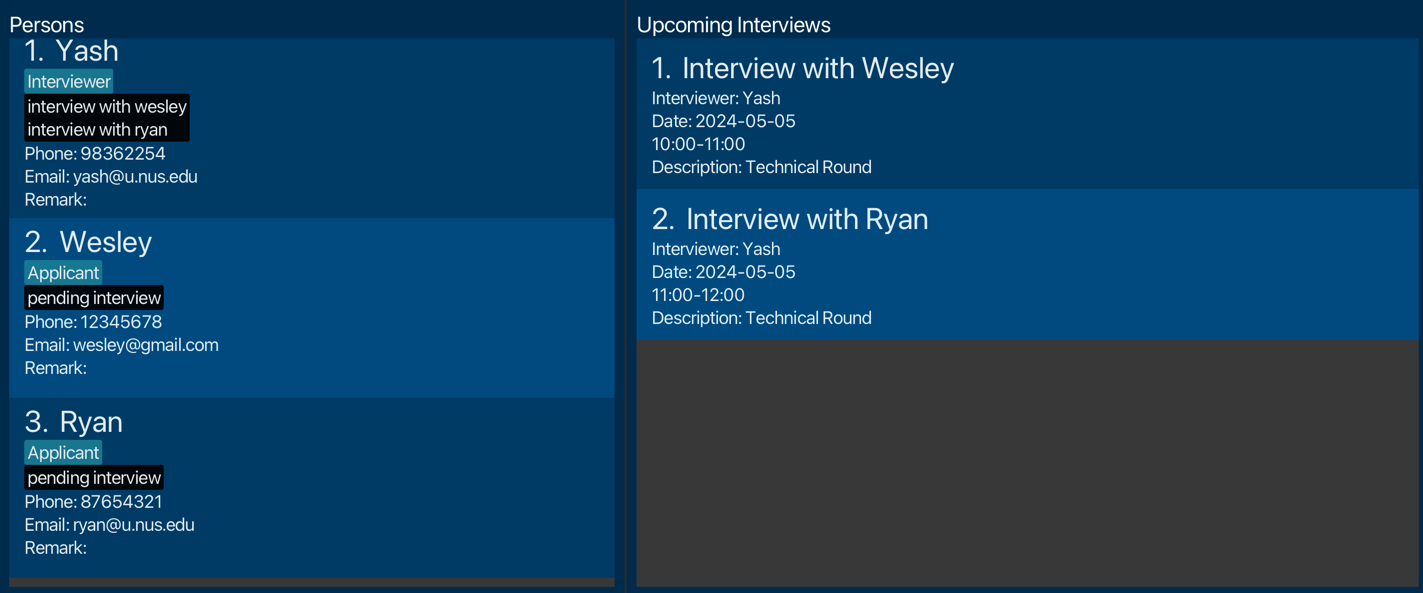
Conversely, if an interview is deleted, the respective status is automatically removed from the interviewer's status stack.
Adding a Remark to a Person:
Once you have Persons in Tether, wouldn't it be nice to annotate them with helpful remarks?
Simply execute remark INDEX r/REMARK where INDEX is the serial number of the person in the list and the REMARK will appear under the respective person.
Example Usage
remark 1 r/Confidentwould add the Confident remark to the person at number 1.
Parameter Constraints
- The INDEX of the person to be removed has to be valid, meaning it should correspond to an existing person in the current list. For example, executing
remark -2 r/Confidentwhen there can't be a negative amount of people, orremark 100 r/Confidentwhen there's only 20 people, will both lead to errors.
Notes
- If you only execute
remark INDEXwithout any parameters, at all the remark of the person at that index will be removed.
Adding an interview:
Now comes a very meaty part of hiring management - scheduling interviews. And to do so, simply execute add_interview desc/DESCRIPTION date/DATE st/START_TIME et/END_TIME a/APPLICANT_PHONE_NUMBER i/INTERVIEWER_PHONE_NUMBER
The following example usage demonstrates the effect of adding an interview in this manner:
Example Usage
add_interview desc/Technical Round date/2024-11-11 st/12:00 et/15:00 a/12345678 i/87654321.
Parameter Constraints
- If the interview does not require a description, simply use an empty parameter
desc/. - Dates must be in
YYYY-MM-DDformat. - Start and end times must be in either
HH:MMorHH:MM:SSformat, and the start-time cannot precede the end-time. Timings follow the 24-hour format.
Notes:
- You can still schedule new interviews for applicants who have already been rejected or accepted. This is simply to accommodate, amongst other possibilities, the possibility of follow-up interviews.
- Scheduling interviews on dates that have already lapsed are allowed, to support you retroactively recording interviews.
- If you attempt to use an interviewer or applicant phone number that does not exist to schedule an interview, tether will tell you that the Person you are looking for does not exist.
- If you use a valid interviewer and applicant phone number but use them in the opposite order in which they are required (i.e. using an interviewer phone number after
a/or an applicant phone number afteri/), Tether will indicate to you that the phone number you keyed in is not a valid applicant or interviewer phone number.
Listing all Persons:
When you've added several applicants or interviewers to Tether, it's helpful to see them all together with their details.
The list of persons and their details is typically shown on the left side of the screen in the GUI, and it updates automatically whenever new persons are added. However, there are also commands like find and filter (explained below) that can change the list shown. If you've used any of these commands and want to go back to seeing the original, unfiltered list of persons, just use the command list_persons.
Listing all Interviews:
Similar to persons, after adding several interviews to Tether, it's useful to see them all together with their details.
The list of interviews and their details is usually displayed on the right side of the GUI, and it updates automatically when new interviews are added. However, there is a filter command (explained below) that can change the list displayed. If you've used this command and want to return to seeing the original, unfiltered list of interviews, simply use the command list_interviews.
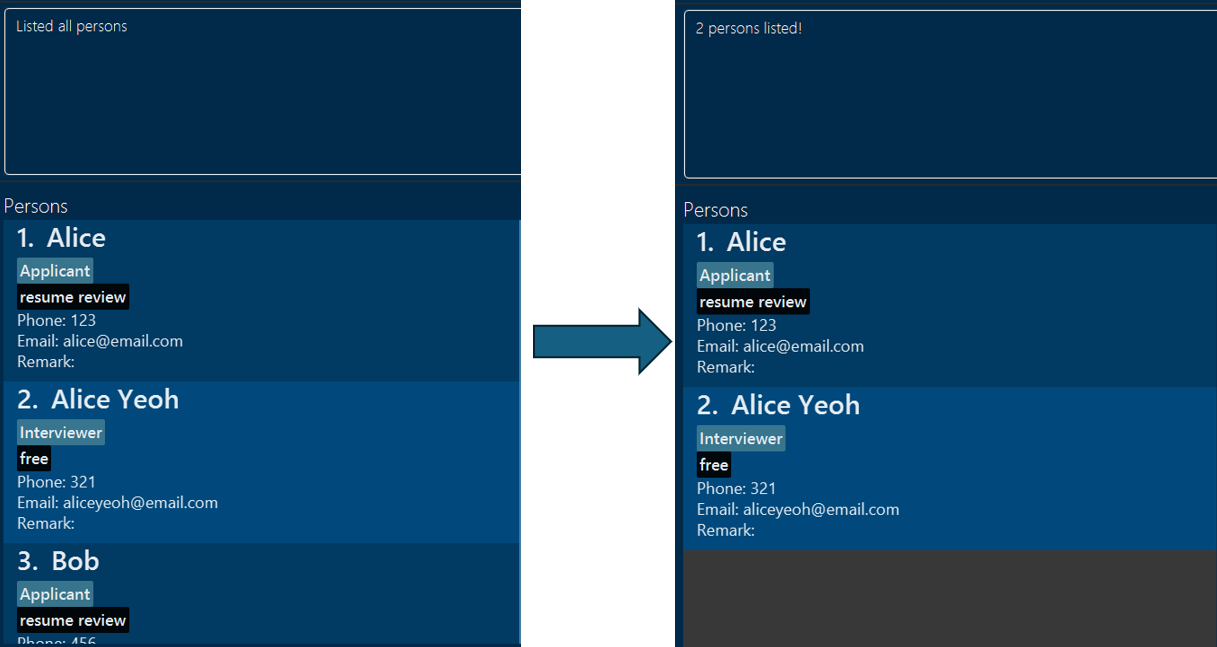
Finding Persons:
After adding multiple persons into Tether, you may find yourself having to manually scroll to locate a specific person.
The find command is useful here to save you time in locating such persons provided you already know at least one of
the following 3 details of the person: their email, name or phone number.
find can also be used to find multiple persons at once. You can provide multiple parameters after the initial
find_email, find_phone or find_name and all persons that match any of the parameters for these commands will be displayed.
To find a person or persons, execute find_email/name/phone PARAMETER1 PARAMETER2... such as in the example usages illustrated below:
Example Usage:
Single Parameter:
Executing find_name Alice will list all persons containing the name Alice:
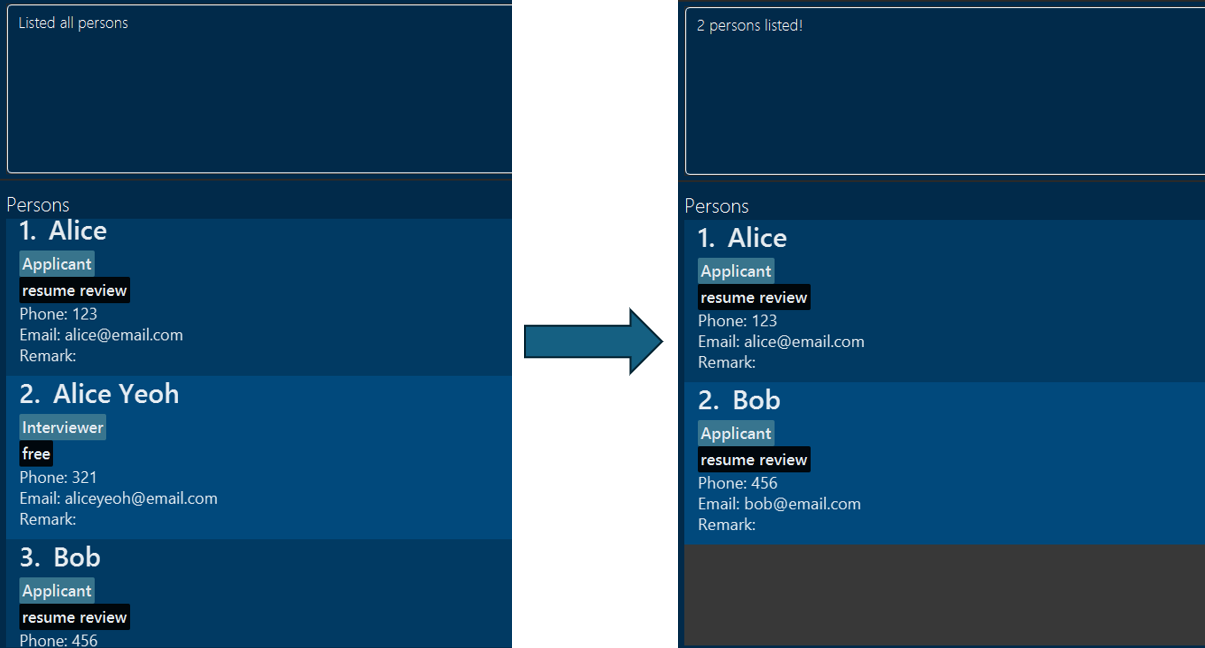
Multiple Parameters:
Executing find_phone 123 456 will list all persons with the phone number 123 or 456 as seen below:
Notes:
- The
findcommand queries the original unfiltered list of persons each time, meaning that sequentially executedfindcommands are not applied on top of the previous ones. - If you use email or phone number, note that they have to match exactly to locate the person entry if it exists.
- If you use name, a full name is not required but the name provided should be complete. Otherwise, there will also be no matching persons. For example,
find_name Alicewill bring up Alice and Alice Yeoh butfind_name Aliwill not return any matches. - The command accepts any parameters, including invalid ones. However, no matching persons will be displayed in such cases. An example of an invalid parameter is
find_email Alice.- However, for multiple parameters, all the parameters should at least be of the same type. For example,
find_phoneshould only be followed by valid phone number(s), not a mix of phones, emails and names.
- However, for multiple parameters, all the parameters should at least be of the same type. For example,
Filtering Persons by Status:
What if you have no information about an applicant or interviewer's name, phone or email though? Fret not, for the filter_by_status command enables you to narrow down the current list of persons on the basis of their current status.
Simply execute filter_by_status STATUS, and the displayed list will update to show only persons with the required STATUS.
Example Usage
filter_by_status freewill display all interviewers with status free.filter_by_status resume reviewwill display all applicants with status resume review.
Parameter Constraints
- STATUS may only be any one of the valid statuses enumerated in adding a status to an applicant and viewing the status of an interviewer above.
Notes
- As of now, there is only support for a single status parameter.
- If you want to apply filters one-after-the-other seamlessly, you will have to do this manually. For example, after applying
filter_by_status free, you will need tolist_personsagain before applyingfilter_by_status interview with wesley.- If you don't execute
list_persons, then the filters will stack on top of the other and you will be searching for interviewers with status interview with wesley among interviewers with status free, which will logically result in finding no interviewers at all.
- If you don't execute
- If there are no persons with the given status, Tether will simply inform you that there are no persons found and the displayed list will remain unchanged.
- Statuses must be matched exactly i.e.
filter_by_status interview with weswill not match an interviewer with status interview with wesley.
Filtering Interviews by Date:
Navigating through a dense schedule to find specific interviews can be daunting.
Tether simplifies this with the filter_interviews_by_date DATE command, allowing you to instantly locate all interviews scheduled for the given DATE.
To view your full interview schedule, simply use the list_interviews command.
Example Usage
- For instance, to see all interviews on May 5th, 2024, you would use
filter_interviews_by_date 2024-05-05.
Parameter Constraints
- DATE must be in YYYY-MM-DD format and must be a valid date.
Notes
- If there are no interviews with the given date, Tether will simply inform you that there are no interviews found and the displayed list will remain unchanged.
- If you want to apply filters one-after-the-other seamlessly, you will have to do this manually. For example, after applying
filter_interviews_by_date 2024-05-05, and if there exists interviews on that date, you will need tolist_interviewsagain before applyingfilter_interviews_by_date 2024-06-06.
Deleting a Person:
If you're confident in removing a person from Tether if - for example - an interviewer leaves your company or an applicant is out of the hiring process, then execute delete_person PHONE and the person with the given PHONE will be removed permanently.
Example Usage:
delete_person 81239123would delete that person.
Deleting an Interview:
If you're confident in unscheduling an interview, perhaps due to changed availability or an unexpected clash, then execute delete_interview INDEX and the interview numbered at INDEX will be removed permanently.
Example Usage:
delete_interview 1would delete the first interview in the list.
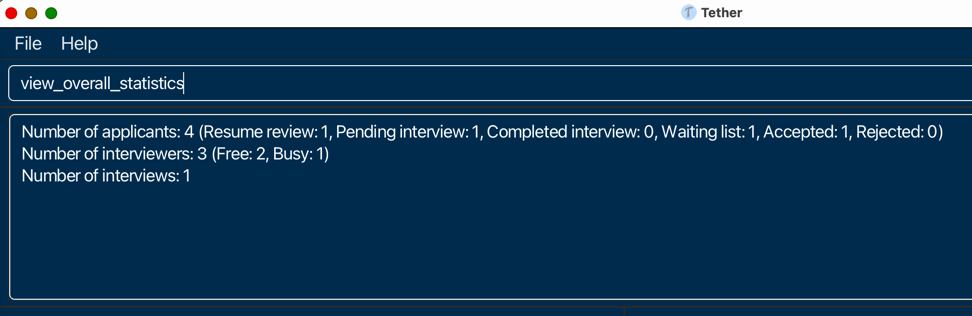
View Overall Statistics:
Core features such as adding, finding, status management and deleting are likely going to be your bread and butter as a hiring manager. However, often you may be tasked to analyse and report certain statistics that may be tedious to compute manually.
Tether has some basic support for viewing statistics, particularly:
- Total number of applicants as well as applicant numbers by status
- Total number of interviewers as well as interviewer numbers by status
- Total number of interviews
A simple example usage would be view_overall_statistics to get a result as such:
Clear all existing data:
If you made multiple mistakes and wish to rebuild your hiring data from scratch, the clear command deletes all existing data in Tether, giving you the fresh start you require.
Notes
- This action is irreversible. The moment you enter the command and see the success message Addressbook has been cleared!, all your data will be deleted permanently. Do exercise caution with this particular command by making an independent copy of your data before clearing it.
Exiting the program:
If you're clocking out for the day, either execute exit directly or press the File button in the taskbar and then press Exit to quit Tether.
Saving Your Data
Tether's person and interview data are saved in the hard disk [7] automatically after any command that changes the data.
There is no need to save manually.
Planned Enhancements and Known Limitations
Tether is always a Work-In-Progress as we are constantly refining our application for your needs. Listed below are some of our planned enhancements as well as current limitations, to keep you abreast of the current state of our application.
Planned Enhancements
- Managing Persons/Interviews
- An
editcommand to amend any of the fields of a person or interview. - A
tagcommand andt/parameter to add and edit custom tags for persons/interviews. undoandredofor commands.- Separate lists in the GUI for Applicants and Interviewers as opposed to displaying them together in one Persons list.
- Custom statuses for applicants.
- Delete multiple persons at once.
- An
- Interviews
- Delete interviews automatically once an applicant or interviewer is deleted.
- Schedule interview involving multiple applicants or interviewers.
Known Limitations
- User Display
- In general, we focused on a clean interface with minimal moving parts. For this reason, there are many possible areas for improvement in our UI that we are ready and open to work on
- Currently, adding multiple interviews may cause the interviewer's card to expand beyond its bounds.
- Adding extremely long fields for a person/interview may cause the field in the respective cards to spill out of bounds.
- Error Messaging
- Some of our error messages could be more specific in why the command triggered an error and how to rectify this. For now, we wanted to minimise the risk of information overload in lieu of very detailed feedback.
Glossary
- Command Line Interface (CLI) : It is a software mechanism you use to interact with your computer using your keyboard.
- Graphical User Interface (GUI) : It is a user interface that allows users to interact with graphical icons like buttons.
- JSON: A text-based format for representing structured data involving specific fields and their values.
- Person : Refers to an applicant or an interviewer.
- Parameter : Information to be supplied by the user into commands.
- Alphanumeric : Alphabets
a-z(both lower and uppercase) and numbers0-9. - Hard disk : The storage component of your computer.
FAQ
Q: How do I transfer my data to another Computer?
A: Install the app in the other computer and overwrite the empty data file it creates with the file that contains
the data of your previous Tether home folder.
Command summary
| Action | Format, Examples |
|---|---|
| Add Applicant | add_applicant n/NAME p/PHONE e/EMAIL e.g., add_applicant n/John Doe p/81239123 e/johndoe123@gmail.com |
| Change Applicant Status | applicant_status PHONE s/STATUS e.g., applicant_status 81239123 s/accepted |
| Add Interviewer | add_interviewer n/NAME p/PHONE e/EMAIL e.g., add_interviewer n/Jane Doe p/81239123 e/janed@example.com |
| Change Interviewer Status | interviewer_status PHONE s/STATUS e.g., interviewer_status 81239123 s/free |
| Add a Remark to Person | remark INDEX r/REMARK e.g, remark 1 r/Confident |
| Add Interview | add_interview desc/DESCRIPTION date/DATE st/START_TIME et/END_TIME a/APPLICANT_PHONE i/INTERVIEWER_PHONEe.g., add_interview desc/Interview with John date/2024-11-11 st/10:00 et/11:00 a/81239123 i/91238123 |
| Delete Person | delete_person PHONE e.g., delete_person 81239123 |
| Delete Interview | delete_interview INDEXe.g., delete_interview 1 |
| List Interviews | list_interviews |
| List Persons | list_persons |
| Find Persons | find_email/name/phone PARAMETER1 PARAMETER2... e.g., find_name Alice or find_phone 123 456 789 |
| Filter Persons by Status | filter_by_status STATUS e.g., filter_by_status free |
| Filter Interviews by date | filter_interviews_by_date DATE e.g., filter_interviews_by_date 2024-05-05 |
| View Overall Statistics | view_overall_statistics |
| Clear All Existing Data | clear |
| Exit | exit |
| Help | help |